ubuntu常用设置.
vim 1 2 3 4 5 6 7 8 9 10 11 12 13 14 15 16 17 sudo apt install vim # 添加配置文件 vim ~/.vimrc "set paste "set nopaste set expandtab set softtabstop=2 set autoindent set tabstop=2 set shiftwidth=2 set nu syntax on set mouse=a "支持鼠标滑轮 set mouse=v "支持鼠标选中复制 "set viminfo='1000,<500
用户 1 2 3 4 5 6 7 8 9 10 11 12 13 14 useradd -d /home/sanzo -s /bin/bash -m sanzo passwd sanzo usermod -a -G sudo sanzo sudo userdel -r test cat .ssh/id_ras.pub | ssh user@hostname "cat >> ~/.ssh/authorized_keys"
代理
配置v2ray
v2ray-core/releases
1 2 3 4 5 6 mkdir v2ray && cd v2ray wget https://raw.githubusercontent.com/v2fly/fhs-install-v2ray/master/install-release.sh sudo bash install-release.sh --local ./v2ray-linux-64.zip # local user runnohup ./v2ray run config.json > v2ray.log 2>&1 &
v2ray config.json配置
proxychains
1 2 3 4 5 6 sudo apt install proxychains # 修改配置文件 sudo vim /etc/proxychains.conf # 最后一行改为对应自己的端口 socks5 127.0.0.1 10800
apt代理
1 2 3 sudo vim /etc/apt/apt.conf.d/proxy.conf Acquire::http::Proxy "socks5h://127.0.0.1:10800"; Acquire::https::Proxy "socks5h://127.0.0.1:10800";
bash代理
1 2 3 4 5 6 7 8 vim ~/.bashrc # vim ~/.zshrc export ALL_PROXY="socks5://127.0.0.1:10800" export all_proxy="socks5://127.0.0.1:10800" export http_proxy="http://127.0.0.1:10801" export https_proxy="https://127.0.0.1:10801" # export https_proxy="http://127.0.0.1:10801"
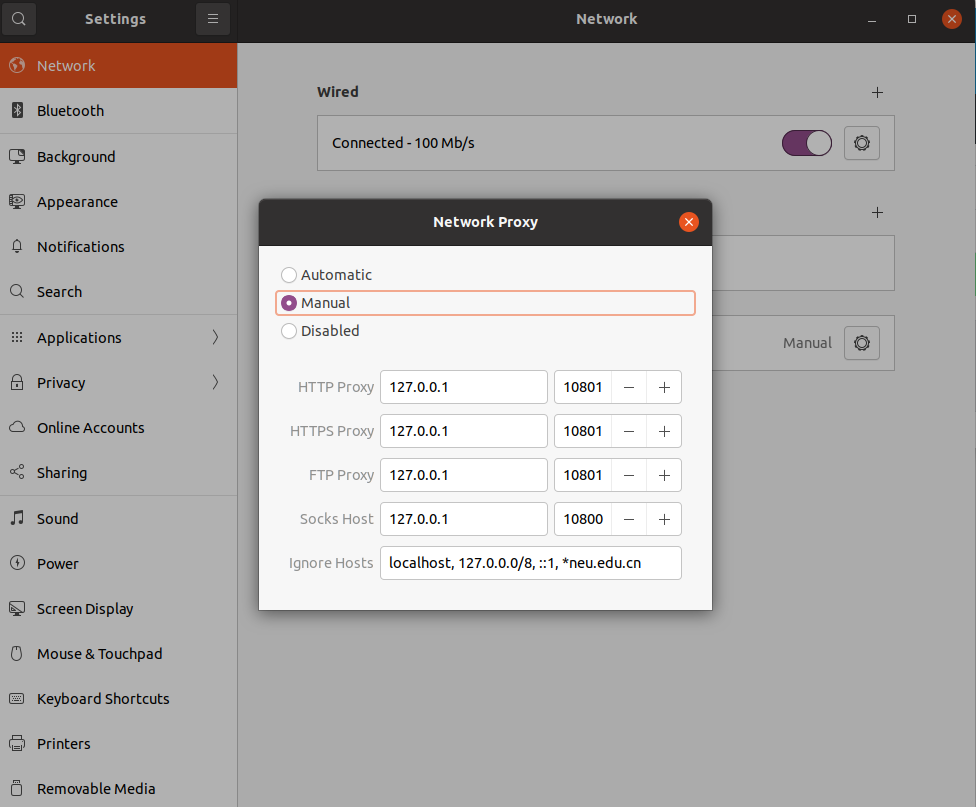
在setting中设置了http,apt和bash应该可以不用再设置了,以防万一可以加上。
git 1 2 3 4 5 6 7 8 9 10 11 sudo apt install git # 环境配置 git config --global user.email "arrangeman@163.com" git config --global user.name "Sanzo00" # 生成公钥和私钥 ssh-keygen -t rsa -C "your_email@example.com" # 将公钥放到github中 cat ~/.ssh/id_rsa.pub
代理
1 2 3 4 5 6 7 8 9 10 11 12 13 14 15 16 17 18 19 20 21 22 23 git config --global http.proxy http://127.0.0.1:10801 git config --global https.proxy https://127.0.0.1:10801 git config --global http.proxy socks5://127.0.0.1:10800 git config --global https.proxy socks5://127.0.0.1:10800 git config --global --unset http.proxy git config --global --unset https.proxy sudo apt install connect-proxyvim ~/.ssh/config Host github.com User git ProxyCommand connect -S 127.0.0.1:10800 %h %p Host github.com User git ProxyCommand connect -H 127.0.0.1:10801 %h %p
zsh https://sanzo.top/Linux/zsh/
1 2 3 4 5 6 7 8 sudo apt install zshsh -c "$(wget -O- https://raw.githubusercontent.com/ohmyzsh/ohmyzsh/master/tools/install.sh) " chsh -s /bin/zsh
插件
1 2 3 4 5 6 7 8 9 10 11 12 13 14 15 16 git clone https://github.com/zsh-users/zsh-autosuggestions.git $ZSH_CUSTOM /plugins/zsh-autosuggestions git clone https://github.com/zsh-users/zsh-syntax-highlighting.git $ZSH_CUSTOM /plugins/zsh-syntax-highlighting vim ~/.zshrc plugins=( git zsh-autosuggestions zsh-syntax-highlighting ) source ~/.zshrc
鼠标
修改滑轮速度
IMWheel
1 2 3 4 5 6 7 8 9 10 sudo apt install imwheel sudo vim ~/.imwheelrc ".*" None, Up, Button4, 5 # 速度 None, Down, Button5, 5 # 速度 Control_L, Up, Control_L|Button4 Control_L, Down, Control_L|Button5 Shift_L, Up, Shift_L|Button4 Shift_L, Down, Shift_L|Button5
开机自启
1 2 3 4 5 6 7 8 9 10 11 12 13 14 15 16 17 18 19 20 21 sudo ~/.config/systemd/user vim ~/.config/systemd/user/imwheel.service [Unit] Description=IMWheel Wants=display-manager.service After=display-manager.service [Service] Type=simple Environment=XAUTHORITY=%h/.Xauthority ExecStart=/usr/bin/imwheel -d ExecStop=/usr/bin/pkill imwheel RemainAfterExit=yes [Install] WantedBy=graphical-session.target systemctl --user daemon-reload systemctl --user enable --now imwheel.service journalctl --user --unit imwheel.service
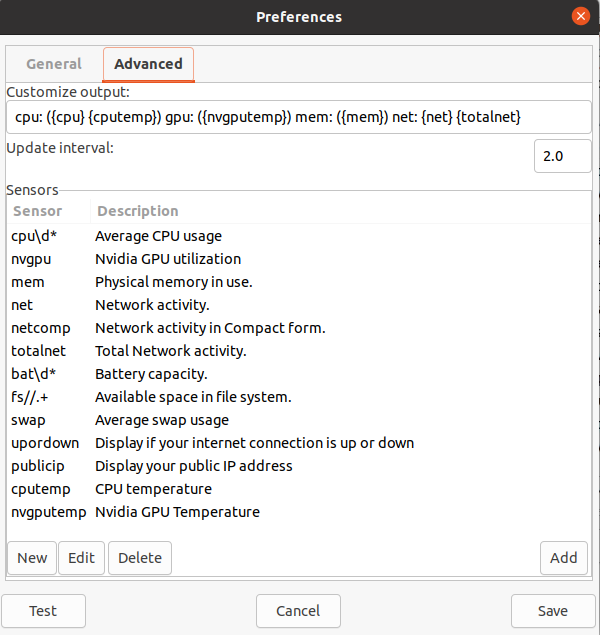
网速监控 1 2 3 4 5 6 7 8 sudo add-apt-repository ppa:fossfreedom/indicator-sysmonitor -y sudo apt update sudo apt-get install indicator-sysmonitor # 运行 indicator-sysmonitor cpu: ({cpu} {cputemp}) gpu: ({nvgputemp}) mem: ({mem}) net: {net} {totalnet}
截图 我在windows上用的snipaste ,不过linux还没出,有两个方案可以代替:
1、系统默认的截图工具
PrtSc – 获取整个屏幕的截图并保存到 Pictures 目录。Shift + PrtSc – 获取屏幕的某个区域截图并保存到 Pictures 目录。Alt + PrtSc –获取当前窗口的截图并保存到 Pictures 目录。Ctrl + PrtSc – 获取整个屏幕的截图并存放到剪贴板。Shift + Ctrl + PrtSc – 获取屏幕的某个区域截图并存放到剪贴板。Ctrl + Alt + PrtSc – 获取当前窗口的 截图并存放到剪贴板。
2、flameshot
1 2 3 4 5 # install apt install flameshot # start flameshot gui
显卡 显卡算力
cuda对应的最低驱动版本
Ubuntu20.04安装NVIDIA显卡驱动+cuda+cudnn配置深度学习环境
驱动安装
1 2 # 查看显卡型号 lspci | grep -i nvidia
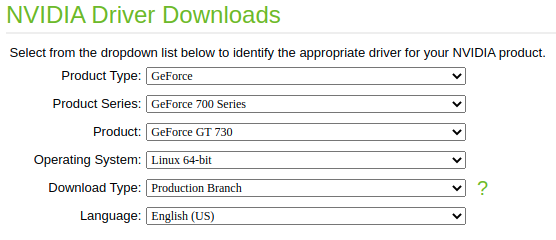
下载驱动
1 2 3 4 5 6 7 8 9 10 11 12 13 14 15 sudo apt install -y lightdm gcc make sudo passwd root # 切换桌面,选择lightdm sudo dpkg-reconfigure gdm3 # 关闭lightdm桌面 systemctl stop lightdm sudo chmod a+x NVIDIA-Linux-x86_64-450.80.02.run sudo ./NVIDIA-Linux-x86_64-450.80.02.run -no-x-check -no-nouveau-check -no-opengl-files --no-kernel-module # -no-x-check:安装时关闭X服务 # -no-nouveau-check: 安装时禁用nouveau # -no-opengl-files:只安装驱动文件,不安装OpenGL文件 # 后面出来的提示,选择默认选项
如果出现/dev/xxx: clean的问题,进不了桌面,可能是因为驱动不匹配的问题。可以删除/etc/X11/xorg.conf。
如果出现An NVIDIA kernel module 'nvidia-drm' appears to already be loaded in your kernel. This may be because it is in use (for example, by an X server, a CUDA program, or the NVIDIA Persistence Daemon), but this may also happen if your kernel was configured without support for module unloading.
1 2 3 4 5 6 7 8 sudo systemctl isolate multi-user.targetmodprobe -r nvidia-drm sudo systemctl start graphical.target
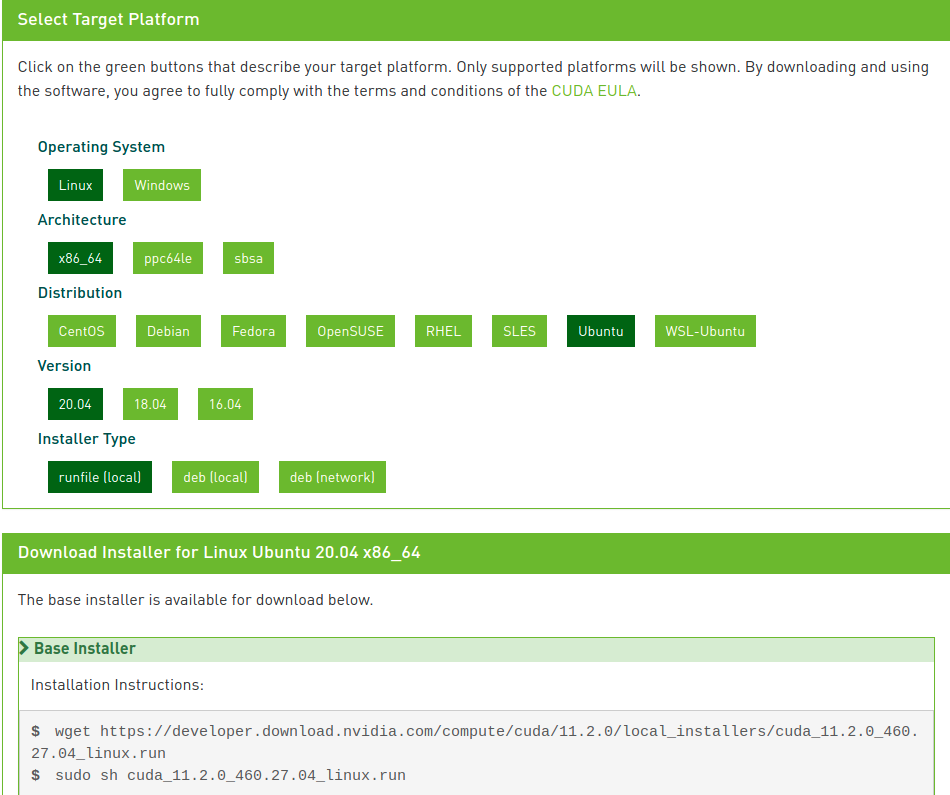
安装cuda
下载cuda ,这里我选择的是cuda 11.2。
1 2 wget https://developer.download.nvidia.com/compute/cuda/11.2.0/local_installers/cuda_11.2.0_460.27.04_linux.run sudo sh cuda_11.2.0_460.27.04_linux.run
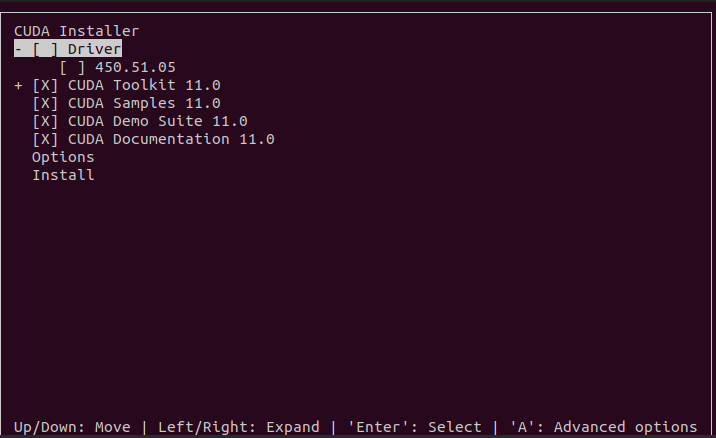
回车取消勾选Driver,因为前面已经装过驱动,然后install,也可以在Options中自定义安装位置。
在.bashrc文件中配置环境变量
1 2 export PATH=/usr/local/cuda-11.2/bin:${PATH} export LD_LIBRARY_PATH=/usr/local/cuda-11.2/lib64:${LD_LIBRARY_PATH}
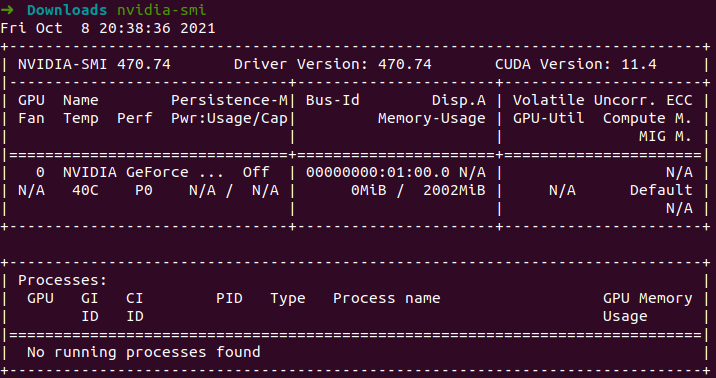
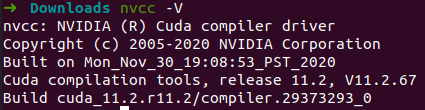
1 2 3 4 source ~/.bashrc # 测试cuda nvcc -V
安装cudnn
下载cudnn
1 2 3 4 # 将文件复制到cuda对应的文件夹下 sudo cp cuda/include/cudnn.h /usr/local/cuda/include/ sudo cp cuda/include/cudnn_version.h /usr/local/cuda/include/ # for cudnn v8+ sudo cp cuda/lib64/libcudnn* /usr/local/cuda/lib64/
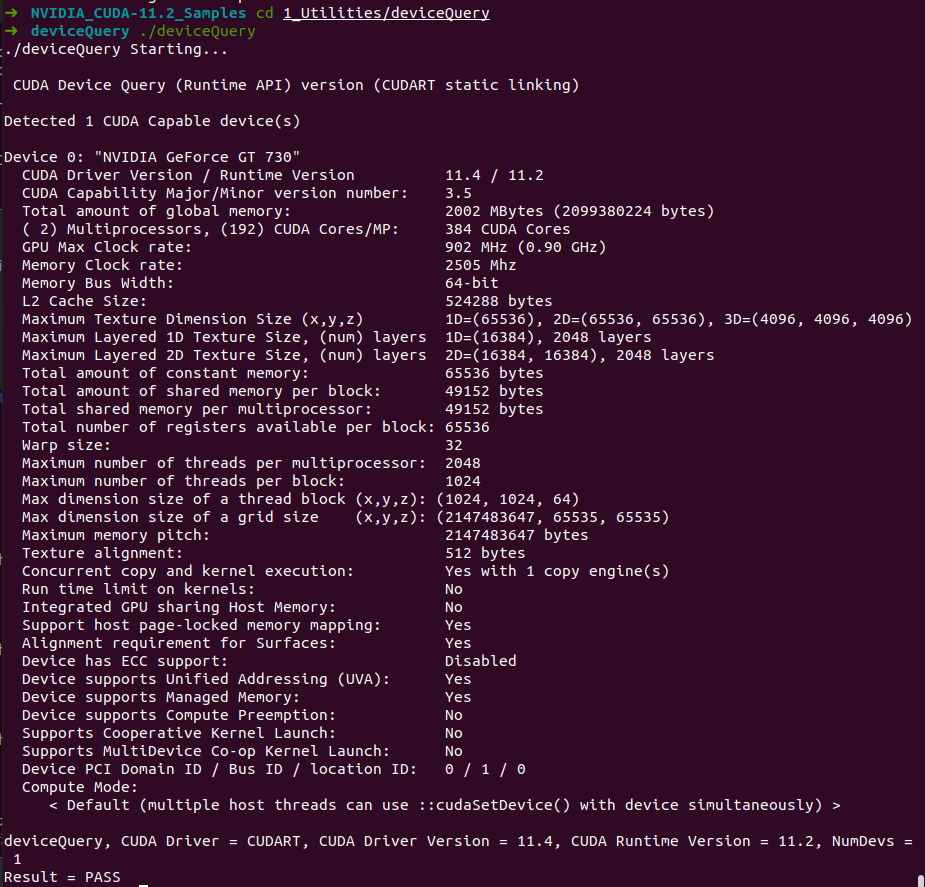
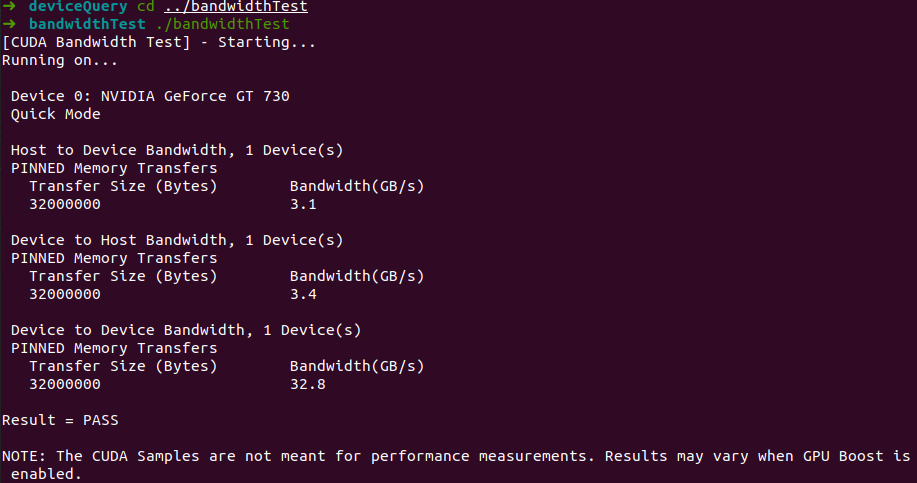
测试
在~/NVIDIA_CUDA-11.2_Samples下编译代码,然后运行cuda提供的例子。
踩坑
apt 更新软件包之后,导致显卡驱动失效,这是因为内核版本发生了变化,将内核回退到上一个版本即可。
https://www.jianshu.com/p/5ac8aa703075
显示器 适用于多个显示器。
我这里有两块屏幕HDMI-1,HDMI-1-0。
1 2 3 4 5 6 7 8 9 10 11 12 13 14 15 16 17 # 查看当前显示器信息 xrandr # 设置HDMI-1为主屏幕 xrandr --output HDMI-1 --primary # 只显示一个屏幕,关闭HDMI-1-0屏幕 xrandr --output HDMI-1 --auto --output HDMI-1-0 --off # 复制屏幕 xrandr --output HDMI-1-0 --same-as HDMI-1 --auto # 设置HDMI-1-0为左扩展屏 xrandr --output HDMI-1-0 --left-of HDMI-1 --auto # 设置HDMI-1-0右扩展屏 xrandr --output HDMI-1-0 --right-of HDMI-1 --auto
开机自启
还没找到合适的开机自启命令,不过可以在系统设置中调。
VSCode vscode
server端网络不好,“Downloading VS Code Server”
进入~/.vscode-server/bin/查看vscode server的commit id,然后手动下载上传到服务器。
下载链接:https://update.code.visualstudio.com/commit:${commit_id}/server-linux-x64/stable
解压之后重命名为commit id,然后放到~/.vscode-server/bin/
服务器
添加用户通知
1 2 sudo vim /etc/profile.d/user_notice.shsudo chmod +x /etc/profile.d/user_notice.sh
1 2 3 4 5 6 7 8 9 10 11 12 13 14 15 16 17 18 19 20 21 22 23 24 25 26 27 28 29 30 31 32 33 34 35 36 37 38 39 40 41 42 43 44 45 46 47 48 49 50 51 52 53 54 55 56 57 58 59 60 61 62 63 64 65 66 67 68 69 70 71 72 73 74 75 76 77 78 79 80 81 82 83 84 85 86 87 88 89 90 91 92 93 94 95 96 97 98 99 100 101 102 103 104 105 106 107 108 109 110 111 112 113 114 115 116 117 118 119 #!/bin/bash case $- in *i*) ;; *) return ;; esac RED='\033[0;31m' GREEN='\033[0;32m' YELLOW='\033[1;33m' BLUE='\033[0;34m' CYAN='\033[0;36m' NC='\033[0m' proxy_on export http_proxy="http://127.0.0.1:7890" export HTTP_PROXY="http://127.0.0.1:7890" export https_proxy="http://127.0.0.1:7890" export HTTPS_PROXY="http://127.0.0.1:7890" export all_proxy="socks5://127.0.0.1:7891" export ALL_PROXY="socks5://127.0.0.1:7891" echo "Proxy ON" } proxy_off unset http_proxy HTTP_PROXY unset https_proxy HTTPS_PROXY unset all_proxy ALL_PROXY echo "Proxy OFF" } get_cpu_usage read cpu user nice system idle iowait irq softirq steal guest guest_nice < /proc/stat idle1=$((idle + iowait)) total1=$((user + nice + system + idle + iowait + irq + softirq + steal)) sleep 0.2 read cpu user nice system idle iowait irq softirq steal guest guest_nice < /proc/stat idle2=$((idle + iowait)) total2=$((user + nice + system + idle + iowait + irq + softirq + steal)) total_diff=$((total2 - total1)) idle_diff=$((idle2 - idle1)) if [ "$total_diff " -gt 0 ]; then awk "BEGIN {printf \"%.1f%%\", (1 - $idle_diff / $total_diff ) * 100}" else echo "N/A" fi } CPU_USAGE=$(get_cpu_usage) LOAD_AVG=$(uptime | awk -F'load average:' '{print $2}' | sed 's/^ //' ) MEM_INFO=$(free -h | awk '/^Mem:/ {print $3 "/" $2}' ) MEM_USAGE=$(free -m | awk '/^Mem:/ {printf "%.1f%%", $3/$2*100}' ) alias Hi="source /etc/profile.d/user_notice.sh" echo -e "${BLUE} ================================================================${NC} " echo -e "${GREEN} 欢迎登录系统, $USER !${NC} " echo -e "用户 ID : $(id -u) | 所属组: $(groups | cut -d' ' -f1,2,3) ..." echo -e "系统运行时间: $(uptime -p) " echo echo -e "${BLUE} [ 系统状态 ]${NC} " echo -e " - CPU 使用率: ${CYAN} ${CPU_USAGE} ${NC} | Load Avg:${CYAN} ${LOAD_AVG} ${NC} " echo -e " - 内存使用: ${CYAN} ${MEM_INFO} ${NC} (${CYAN} ${MEM_USAGE} ${NC} )" echo -e " - 磁盘使用:" df -h -x tmpfs -x devtmpfs --output=source ,size,used,avail,pcent,target \ | awk -v CYAN="$CYAN " -v NC="$NC " ' NR==1 { printf " %-24s %8s %8s %8s %8s %s\n", $1, $2, $3, $4, $5, $6 next } $6=="/" || $6 ~ /^\/home/ || $6 ~ /^\/data/ || $6 ~ /^\/mnt/ { printf " %-24s %8s %8s %8s %s%8s%s %s\n", $1, $2, $3, $4, CYAN, $5, NC, $6 } ' if command -v nvidia-smi >/dev/null 2>&1; then GPU_INFO=$(timeout 2 nvidia-smi --query-gpu=index,name,utilization.gpu,memory.used,memory.total --format=csv,noheader,nounits 2>/dev/null) if [ -n "$GPU_INFO " ]; then echo -e " - GPU 状态:" echo "$GPU_INFO " | while IFS=',' read idx name util mem_used mem_total; do echo -e " ${CYAN} GPU ${idx} :${NC} ${name} | Util: ${CYAN} ${util} %${NC} | Mem: ${CYAN} ${mem_used} /${mem_total} MiB${NC} " done fi else echo -e " - GPU 状态: ${CYAN} 未检测到 nvidia-smi${NC} " fi echo echo -e "${GREEN} [ 使用提示 ]${NC} " echo -e " - 系统配置了代理环境,可通过 ${GREEN} proxy_on${NC} 开启代理,${GREEN} proxy_off${NC} 关闭代理。" echo -e " - 代理端口为 ${GREEN} 7890${NC} ,如需测试网络连通性,可执行:" echo -e " ${GREEN} curl -I https://www.google.com${NC} " echo -e " - 输入 ${GREEN} Hi${NC} 可再次查看系统提示。" echo echo -e "${BLUE} [ 存储规范 ]${NC} " echo -e " - 请注意磁盘空间管理,数据集、模型文件和 Python 环境建议放到以 ${YELLOW} /home/hdd${NC} 开头的磁盘。" echo -e " - 避免在系统盘或家目录中存放大文件,以免影响系统稳定性。" echo echo -e "${YELLOW} [ 权限与审计 ]${NC} " echo -e " - 如需使用 Docker 权限,请联系管理员添加。" echo -e " - ${YELLOW} sudo 和 Docker 的所有操作都会被系统审计,请谨慎使用。${NC} " echo -e "${BLUE} ================================================================${NC} "
配置zsh(可选)
1 2 3 4 5 if [[ -n "$SSH_CONNECTION " && -o interactive && -r /etc/profile.d/user_notice.sh ]]; then source /etc/profile.d/user_notice.sh fi
audit审计
1 2 3 4 5 6 7 8 9 10 11 sudo apt install auditd audispd-plugins -ysudo systemctl enable --now auditdsudo vim /etc/audit/rules.d/common.rulessudo augenrules --loadsudo auditctl -l | grep -E "sudo|docker"
sudo和docker配置:
1 2 3 4 5 6 7 8 9 10 11 12 13 14 15 16 17 18 19 20 21 22 23 24 25 26 27 28 -a always,exit -F arch =b64 -S execve -F path=/usr/bin/sudo -F perm=x -k sudo_exec -a always,exit -F arch =b32 -S execve -F path=/usr/bin/sudo -F perm=x -k sudo_exec -a always,exit -F arch =b64 -S execve -F path=/usr/bin/docker -F perm=x -k docker_cli -a always,exit -F arch =b32 -S execve -F path=/usr/bin/docker -F perm=x -k docker_cli -w /usr/bin/dockerd -p x -k docker_daemon -w /usr/bin/containerd -p x -k docker_daemon -w /usr/bin/runc -p x -k docker_runtime -w /etc/docker -p wa -k docker_config -w /etc/docker/daemon.json -p wa -k docker_config -w /lib/systemd/system/docker.service -p wa -k docker_service -w /lib/systemd/system/docker.socket -p wa -k docker_service -w /etc/systemd/system/docker.service.d -p wa -k docker_service -w /var/run/docker.sock -p rwxa -k docker_sock -w /run/docker.sock -p rwxa -k docker_sock
audit常用命令
1 2 3 4 5 6 7 8 9 10 11 12 13 14 15 16 17 18 sudo ausearch -c sudo -isudo ausearch -c docker -isudo ausearch -k docker_cli -isudo ausearch -m USER_CMD -isudo ausearch -m USER_AUTH -isudo ausearch -m USER_ACCT -isudo ausearch -ua yuanh -i
其他 typora
python环境